Microsoft Outlook for Virginia Tech Students
By Shrayus Masanam, Thomas Seely, Harman Singh, Anthony Taveras
Outlook is part of the Microsoft Office Suite, which has been adopted by Virginia Tech. Consequently, Outlook has become an integral application for Virginia Tech students. It provides a platform to receive the many emails students get such as Canvas updates, academic advisor newsletters, as well as providing a central calendar to keep track of events.
However, some of Outlook's features are not obvious, nor enabled by default, leading to a loss in potential productivity. For example, many users don't know that you can set up the software to automatically sort your emails into folders, or have your schedule automatically imported into your calendar. Our guide aims to show VT students the tools they have available to maximize their productivity within Outlook.
Note
This guide is made with the following Outlook interfaces in mind:
-
Outlook website
-
"New" Outlook app (Windows and macOS)
-
Mobile app (iOS and Android)
However, these instructions will primarily focus on the Outlook website and desktop apps. The mobile apps will only be discussed if there are significant differences in the interfaces.
Table of Contents
- Microsoft Outlook for Virginia Tech Students
- Table of Contents
- Email Options
- Calendar Options
- Outcomes
- See also
Email Options
These settings change the look and feel of your Outlook inbox, and can help you save time on automatable tasks, improving workflow.
Note
Some options may be locally saved to the device rather than save to the account; thus, it is important to check settings across devices for consistency.
Folders
Outlook folders bring organization to your inbox, enabling you to have multiple folders in your email outside of the traditional Drafts, Junk, Sent, etc. Sorting emails into these folders can help reduce clutter in your main inbox.
Creating Folders
- Navigate to mail, and click the three dots to the right of the email address.

- Click Create new folder and then name it.
- Now you have folders within Outlook.
Using Folders
- Navigate to an email you want to move to your new folder.
- Right click the email to bring up the action menu and select Move.
Tip
Select multiple messages at once to move emails in bulk quantities
-
Choose the desired folder to move the email into.
- If the folder does not appear, type the name in the search box to find it.

-
Repeat these steps to move more emails into your folders.
Auto Rules
Auto rules prevent inbox clutter by enforcing which folders certain emails are sorted into. For example, you may want Canvas notifications to arrive in your main inbox, and less important emails, from senders like Grubhub or VT Bookstore, to be moved to different folders. Let's walk through an example.
Creating and Enforcing Rules
- Navigate to your Outlook inbox.

- Right click on an email you want to create a rule for, and hover your cursor over Rules.

- Select Create rule to bring up a pop-up.

- Click the Select a folder drop down. You should see the following options.

-
If you have already created a folder you want to move this type of email to, select Move to a different folder, choose the folder you want, and continue to step 7. Otherwise, select Create new folder.
-
Enter a folder name within the New folder name text box. After you type the name, press Save or hit Enter on the keyboard.
 7. With your folder selected, click OK to create your rule.
 8. If you want to apply the rule you just created to relevant emails currently in your inbox, select the Run this rule now in Inbox check box, then click OK. Otherwise, click outside of the window to make it disappear.
Note
When a rule is running, you may notice your inbox changing in real time. This is normal. All applicable emails are moved to the folder allocated for a certain rule.

Auto Signature
You can create a custom signature, such as with a closing, name, and contact info, that automatically appears at the end of each email you write. Signatures must be set up on desktop and in the mobile app separartely.
On Desktop
- Click the settings icon at the top right of the screen, next to your account icon.
- Choose the Account tab, then click Signatures:

- Give a name to the signature you will be creating.
- For example, a work signature or a school signature.
- In the text box, create your custom signature using the options available.
- After the signature is finalized, click Save to add it to your signature list.

- Scroll down to the Select default signatures section.
-
Click the dropdown next to whichever type of email you want your signature to be automatically applied to:
- "For new messages" will apply the signature to the end of all new emails you write.
- "For Replies/Forwards" will apply the signature to your replies and forwarded emails.
-
Choose a signature to assign to each type of message. A single signature can be applied to all types, or multiple can be created and assigned separately. You can also choose not to apply any signature.

- Click Save to finalize your changes.
On the Mobile App
- Open the app.
- Tap the text in the top left of the screen, next to your profile picture. If you're using the app on an Android device, you'll need to tap the profile picture itself instead.

- Tap the settings icon in the bottom left to bring up the settings page.

- Navigate to Quick Settings section and tap the Signature option.

- A text box will appear for you to write your signature in. After you've finished writing, click the check mark in the top right to save it.

Conditional Formatting
Conditional Formatting allows the user to create rules to personalize colors of incoming messages. This can be particularly useful for a different way of highlighting certain emails outside of pinning or flagging them, and it allows you to quickly and automatically identify certain email types from a variety of rules outlined in this section.
To create conditional formatting rules:
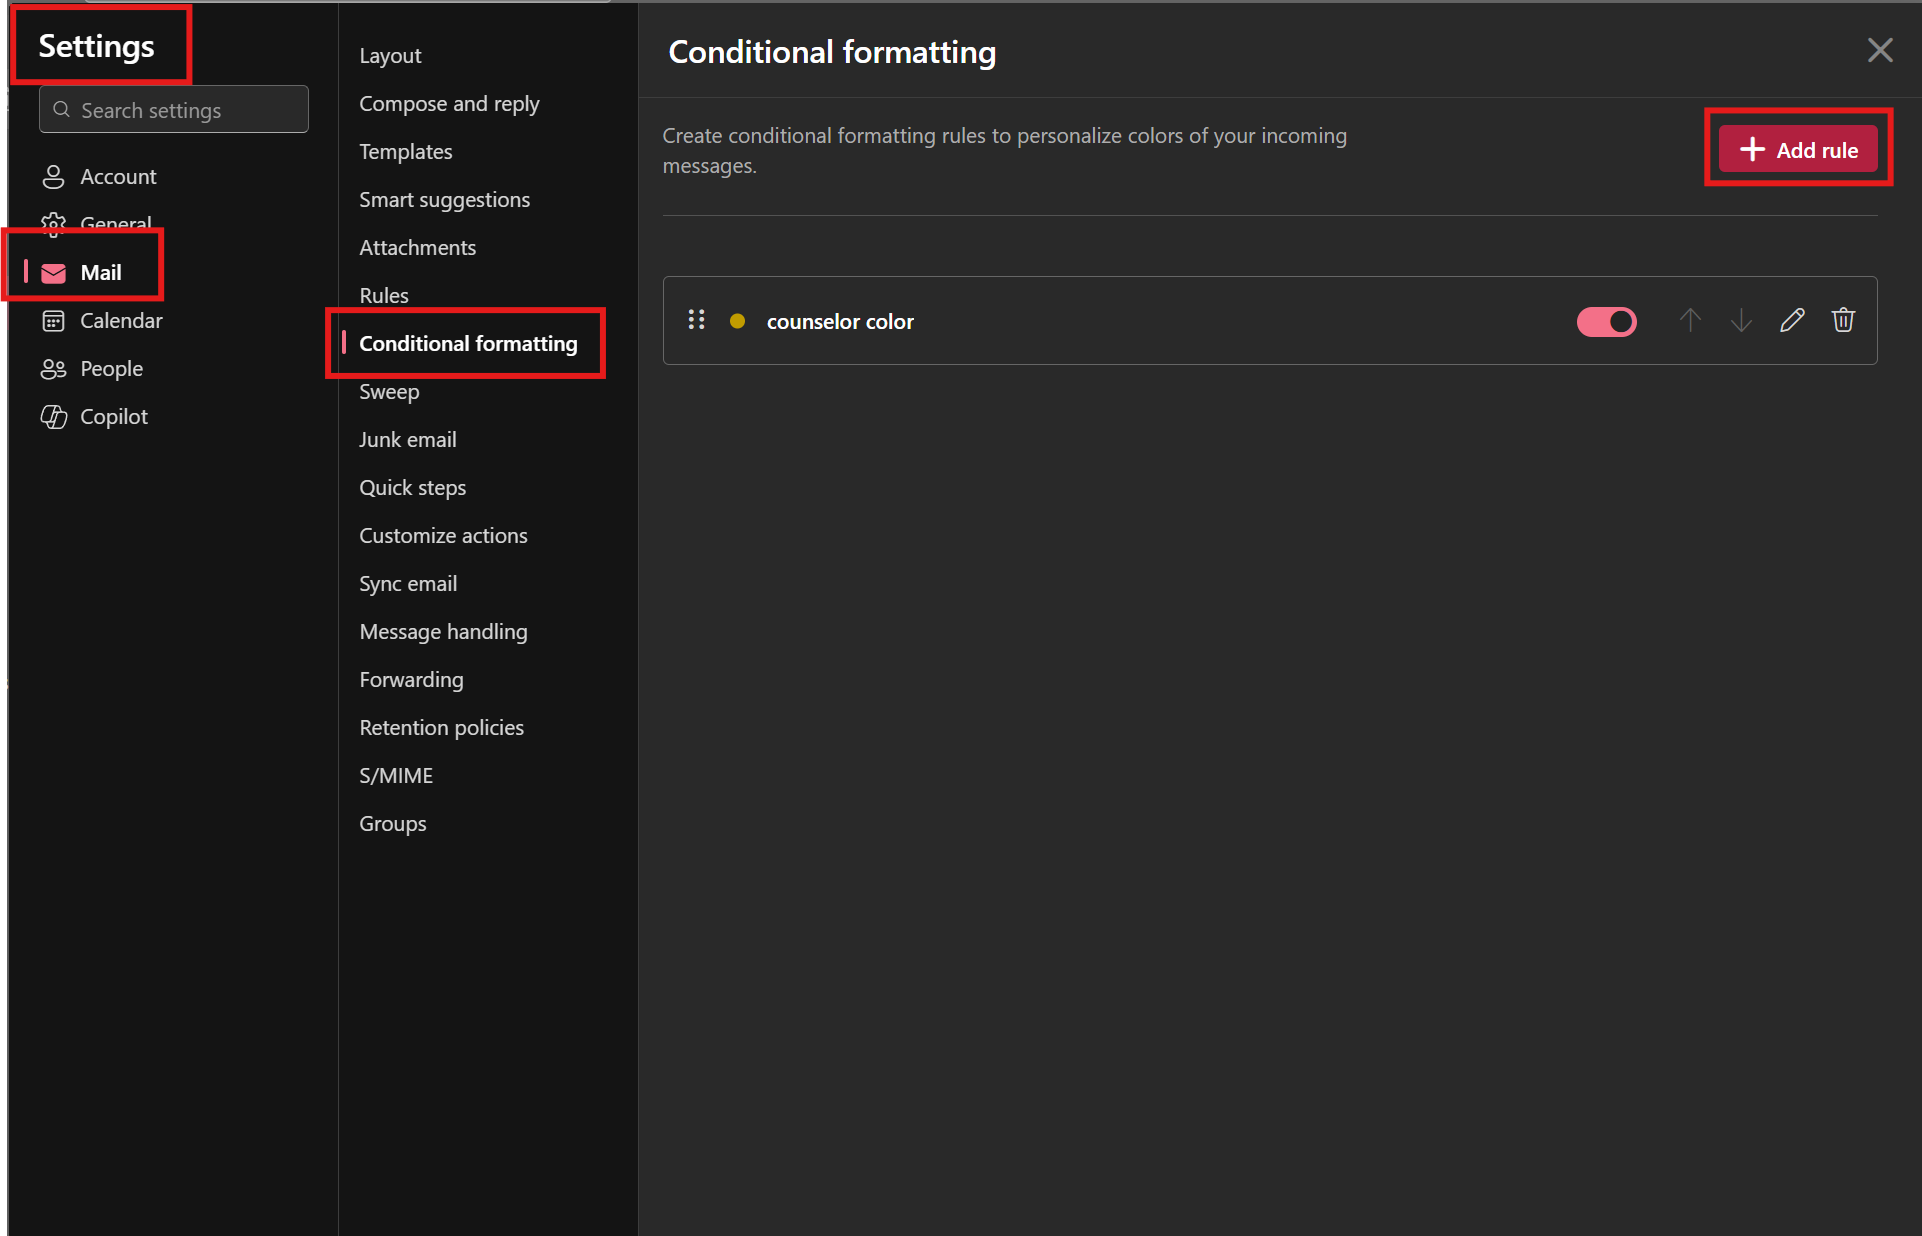
- Go to Outlook settings.
- Click Mail > Conditional formatting > Add rule in the top right.
- Name the rule.
- For example, what do you plan the rule to do?
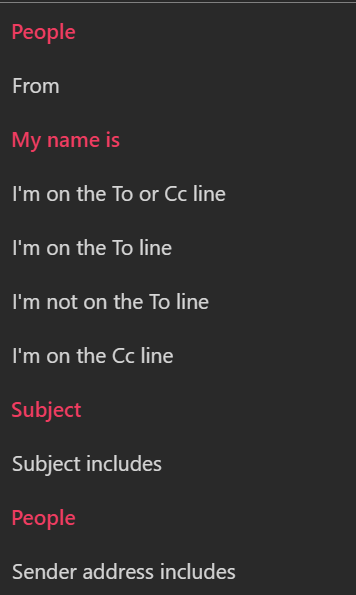
- Select the condition.
- More common conditions are who the email is from or the contents of the subject line.
- These are the list of all conditions, the red ones are headers and are unselectable, and multiple can be chosen at the same time:
- Choose a font color and click Save to finish, now your emails will have some color variety to them.
- These are the available colors:
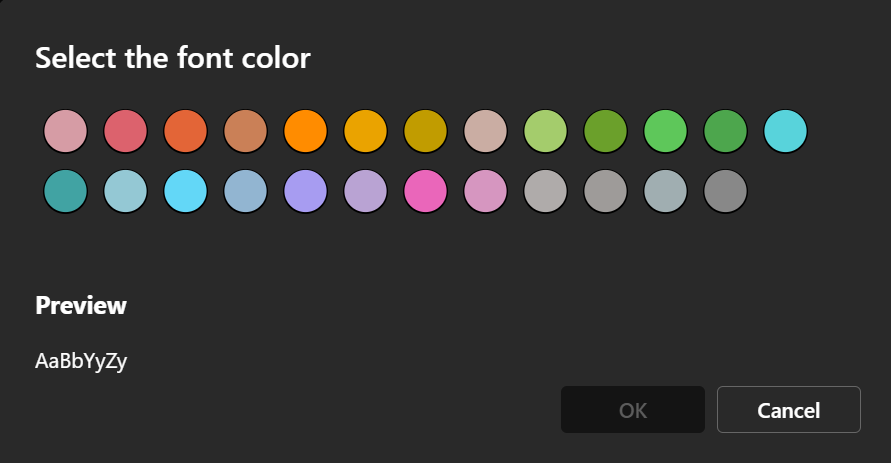
- These are the available colors:
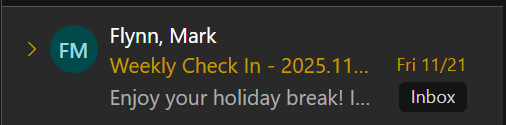
An example of it in action looks like this:
Scheduling Emails
Scheduling emails to be sent at a later time or date is useful for Virginia Tech students. For example, instead of sending an email late at night to a professor, you can instruct Outlook to send the email at a more suitable, professional time.
- Click New mail to generate a new email draft.

- Write your email's contents
- Click the downwards caret symbol dropdown to the right of the Send button.
- Click Schedule send then select Custom Time to pick a desired date and time for the email to be sent.

Calendar Options
These settings can help unify all of your digital events into one centralized location within Outlook. Outlook's calendar also allows you to set reminders for upcoming events, share your event status/RSVP info with others, and even help manage Teams meetings.
Tip
All of these guides involve importing an ICS file into Outlook, which is a standardized calendar file format. If you choose to move away from Outlook in the future, you can easily import these calendars elsewhere.
Importing/Syncing Canvas Calendar
These steps will show you how to import a live calendar into Outlook from Canvas. You only have to do this once, and new assignments will continue to appear until you remove the calendar.
- Log in to Canvas using your university login. You may have to verify your login using Duo.
- In the left-hand navigation sidebar, click on Calendar.

- On the calendar page, click Calendar Feed.

- A popup window will appear titled Calendar Feed. Click on the Click to view Calendar Feed link to download an ICS file of your calendar.

- Open Outlook, and switch to the Calendar tab.
- Click the Add Calendar button, then click the tab titled Upload from file or Import ICS..., depending on the device you're using.

- Click Browse, then select the downloaded ICS file.

- Click Import to finish. Now your assignments should appear in your Outlook calendar.
Importing Class Schedule
Warning
As of October 9th, 2025, Hokie Registration has replaced Add/Drop.
The prior service allowed users to download an .ics file of their schedule to import into calendar software, but Hokie Registration does not provide a similar feature.
From here, you have two options outlined below:
-
Use our open-sourced browser extension to restore the prior functionality
-
Manually create reccuring events for each class
Option 1: Using the VT Schedule Builder extension
1. Install the extension from the Chrome Web Store. This guide assumes you are using the Google Chrome browser, but any browser with Chrome Extension support will work.
2. Log in to Navigate360 with your Virginia Tech login. You may have to verify with Duo.

3. Once you're logged in, click on the VT Schedule Builder extension icon in the Chrome extension bar. If you don't see the extension icon next to the URL bar, click the puzzle piece icon and it should appear in the extensions list.

4. The generated ICS file should start downloading after a few seconds. If you see an error, make sure you are logged in to Navigate360 and are actively on the page. Locate the downloaded .ics file.

5. Open Outlook, and switch to the Calendar tab.

6. Click the Add Calendar button, then click the tab titled Upload from file or Import ICS... depending on your device.

7. Click Browse, then select the downloaded .ics file.

8. Click Import to finish.
Option 2: Manually creating recurring events
This process will outline how to create a recurring outlook event representing one of your classes.1. Have your schedule open and viewable to see its attributes, an example would be viewing your Classic Student Schedule within HokieSPA.
a. In this instruction, we will use an example class titled PHYS 2305, occurring on Monday, Wednesday, and Friday between 10:10 AM to 11:00 AM at HAHN N 130 in the Fall semester.
2. Open Outlook and navigate to the Calendar tab.
3. Click New event in the top right.
4. Fill out necessary information for your class.
a. For our example, we want to title the event PHYS 2305.
b. Set the initial event start date, which can be when the class first started or could be when the next class is. So if its Friday right now, we start it next Monday.
c. Set event times. We chose 10:10 to 11:00 AM to match our example class.
d. To the right of date and time we can make the event reocurring, so we can make it repeat every MWF until December 10, which is the last day of Fall classes.
d. We can also put the location as the room number if available, we can put HAHN N 130.
e. At the top of the event we can also set a reminder for the event, which we can put something like 15 minutes before.
 5. Click save to complete the process, and now you should see the event in your calendar.
6. In the event you have a class cancelled or the class appears during a holiday, you can delete a particular event by right clicking the event, clicking Delete, and This Event.

Note
These methods do not automatically remove classes during holidays, breaks, or finals week. You should verify these events yourself.
Importing GobblerConnect Events
GobblerConnect is the student hub for a variety of organizations and events happening on campus. Being able to track when and where these events take place all in one place is very beneficial to event managers and attendees alike, especially if different events have conflicting times. Importing events into Outlook makes managing scheduling issues a lot easier and less error-prone.
- Find the GobblerConnect event you want to be in your Outlook calendar.
- Click the iCal/Outlook link below the Date and Time tab of the event.

- Save the resulting .ics file into a location you remember such as Downloads or Documents.
- Go to Outlook and to the Calendar tab.
- Click the Add Calendar button below the mini-calendar on the left, then Upload from file.
- Click browse and find the .ics file you stored previously.
- Add it to one of your calendar colors if prompted.
- Now it should appear in your calendar.

Microsoft Teams Interactions
The Outlook calendar allows you to create Microsoft Teams meetings directly without having to open the app itself. When creating or receiving invitations to Teams meetings, you can add them directly to your calendar. A VT student will find themselves attending numerous meetings throughout their academic career. Students may have to join or create meetings with other students for projects, advisor meetings, job interviews, and so on. Therefore, knowing how to integrate them seamlessly into your calendar is critical.
Creating Meetings From Calendar
- Navigate to your Outlook Calendar.
- Click New event in the top left.

- Fill in event details such as attendees, make sure to enable the Teams meeting switch.

- Click Send in the top right when finished.
- Now your meeting should appear in calendar.

- You can join the meeting directly through the calendar, and view event details from here.
Adding Invitations to Calendar
- When receiving a Teams invite from someone else you should receive an email of it.

- At the top of the email is the option to accept the invitation. Clicking accept adds the meeting to your calendar, and deletes the invitation email from your inbox.
Tip
If you still want to view the email after accepting the invitation, it can be viewed in the Deleted Items section of your inbox.
- From your calendar, the event includes a way to join the meeting, meeting description, and time.

Outcomes
Now, you understand how to optimize your Outlook. We covered features in both the email and calendar parts of Outlook. You will notice how these tips directly improve Outlook by keeping your events organized, your inbox hygenic, and your emails professional: the essentials for any VT student.
See also
For more Outlook training by Microsoft, visit their Outlook training webpage For more features about the Outlook calendar, visit their Introduction to the Outlook Calendar webpage